beverages, breakfast, Recipes jo hodson beverages, breakfast, Recipes jo hodson

Tropical summer smoothie (with ginger, turmeric and baobab!)

I typically have my smoothies green (like this one) but these last few days with the sun being out, I have often fancied a chilled afternoon smoothie of the more fruity variety.

This is my current favourite smoothie and I love that it has some ‘boost’ foods in there to bump up the nutritional content without impairing the flavour, in fact it all adds to the flavour.

If you don’t have baobab, that’s ok just leave it out. Baobab is rich in vitamin C and antioxidants and what I most love about it is the sherbert-like flavour which works so well in this smoothie, but it won’t make much difference if you don’t have it. You may like to try adding a squeeze of lemon or lime instead for a little extra zing!

Even when this smoothie has no milk in it (optional), it is still has a creamy texture from the banana and mango and reminds me of mango lassi’s that I often have as a dessert in Indian restaurants.

Give it a try… I think it may become a summer favourite. :-)

I think it would also work well frozen in lolly moulds, but I haven’t yet tried this so let me know if you do! (I suggest using milk and a little less liquid overall if you do this as you want it super creamy)

Ps. as per usual none of my measurements are exact, so you don’t need to weight anything - just eyeball it.

tropical smoothie 2.jpg

Recipe: Tropical Summer Smoothie

Serves 2

Ingredients:

  • 1 cup frozen mango or tropical fruit chunks

  • 1 large banana (if using frozen you may need to add a little extra liquid)

  • 1 thumbnail-sized piece of ginger root (or 1/2 tsp ground)

  • 1 slightly smaller chunks of fresh turmeric or a heaped 1/4 tsp tsp ground

  • A pinch of black pepper

  • 1 tbs baobab powder

  • approx 2 - 2.5 cups water (or milk if you want a super-duper creamy smoothie)

Method:

Blitz together until super smooth. Serve in two tall glasses.

tropical smoothie 1.jpg
mango smoothie 2a.jpg

Read More
main meals, gluten free, Recipes jo hodson main meals, gluten free, Recipes jo hodson

Veggie pesto pine nut squares

This veggie pesto bake is a wonderful summer recipe, especially using fresh basil from the garden!

I wanted to make this recipe for my family at the weekend. I found the photos in my archives from when I first shot the recipe last year for realfoodsource using their new ingredient range, but I couldn't find the actual recipe anywhere!

veg pesto squares 2a.jpg

I have made variations on it - these sweet potato rostis in particular, so I knew the rough idea. I figured I'd have to wing it and hope for the best.... it turned out really well!

Instead of making it as squares as per the original photos, I cooked it in a square oven dish and served it up hot with a huge salad. The squares are still amazing though.

This is best made with spiralized veggies for a pretty ‘curly whirly’ effect but you could use a julienne peeler or a coarse grater. I used a mix of carrot, courgette and a little onion but you could use fewer or different ingredients such a sweet potato or parsnip if you prefer. You could also bake this mix into pre-portioned muffin cups.

To save time I used bought free-from pesto in a jar, but you could make your own, or use hummus with herbs added to it.

veg pesto squares 4a.jpg

Recipe: Veggie pesto pine nut squares

Makes approx 12 squares (a brownie sized pan)

Ingredients:

  • 3 cups spiralized vegetables (I courgette, 2 medium carrots and 1 red onion)

  • ¼ cup almond or cashew paste (optional)

  • 1/2 cup vegan pesto (or regular pesto or hummus and fresh basil)

  • approx. ½ tsp salt (this may depend on the pesto etc used)

  • approx. 3 tbs water

  • A handful of extra fresh basil, roughly chopped

  • 1 cup chickpea (gram) flour

  • ¼ cup pine nuts (up to ½ cup more if preferred)

Method:

Spiralize or julienne the veggies, chop a little to avoid very long ribbons.  Set aside.

Mix together the wet ingredients and add to the coat the veggies (taste test and add salt and pepper as desired). Add the gram flour last and mix to coat well. Add an extra splash of water if the mix doesn’t appear quite wet enough to coat evenly. Mix through the pine nuts now or set aside to press into the top if preferred.

Press the mix firmly into a lightly greased brownie sized tin- the mix should be approx 2cm thick. Smooth the top and press in the pine nuts.  Bake at 180C for approx 25-30 mins until golden. Serve hot or allow to cool and cut into squares- great for lunchboxes or picnics when served cold. Will keep in the fridge for a couple of days.

veg pesto squares 3a.jpg

Read More

Summer Berry Crumble Bars

I made this oat crumble as a surprise 'bressert' for my boyfriend last weekend. His favourite fruit is rhubarb and I had a few stalks in the garden that I wanted to use up.  I wanted a super healthy breakfast crumble that was indulgent enough for dessert (hence bressert).

I had planned for this to be enough to last us for breakfast ABD dessert late in the day.... but we ate it all for breakfast.

I made this oat crumble as a surprise 'bressert' for my boyfriend last weekend. His favourite fruit is rhubarb and I had a few stalks in the garden that I wanted to use up.  I wanted a super healthy breakfast crumble that was indulgent enough for dessert (hence bressert).

I had planned for this to be enough to last us for breakfast AND dessert late in the day.... but we ate it all for breakfast ;-)

vegan berry oat crumble .jpg

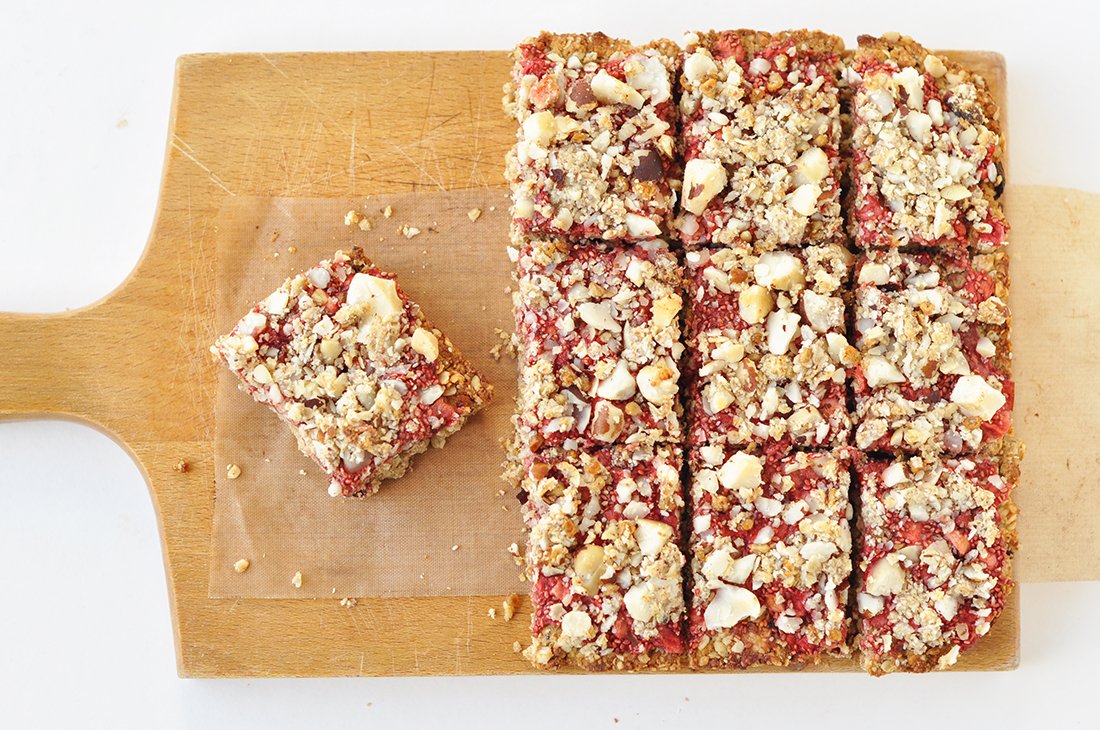
I first made this oat crumble recipe for my 'Not Just For Goldilocks' book, so I won't share it in full right here, BUT I will share with you a great spin-off in the form of these bars. I made the bars in the photos below initially for Real Food Source last year and using the same principle as the crumble I made them again.

These bars are quite soft and cakey with a crisp top, which is how I love them. I used a combination of oats, ground almonds and tiger nut flour for the topping, but other flours in place of tiger nuts and almonds would also work.

They also have a great nutritional boost by way of chia seeds which are also used here to thicken and bind the base and fruit layer.

These are perfect served hot with some vegan for a little indulgence or with a dollop of plain vegan yoghurt for a breakfast option.

tiger nut crumble bars 3a.jpg

Recipe: Summer Berry Crumble Bars

Makes approx 12 squares

Ingredients:

Crumble:

  • 1 ½ cup oats

  • 1/2 cup ground almonds

  • 1 cup tiger nut flour (or other flour such as wholemeal, spelt or a gluten-free blend)

  • ½ cup coconut oil– melted

  • approx. 2 tbs coconut syrup (to taste)

  • 2 tbs chia seeds and 3 tbs warm water (mixed to gel)

Berry Layer:

  • 1 heaped cup stewed fruit (I used a combination of apple, rhubarb and raspberries)*

  • approx. 1 tbs maple syrup

  • 2 tbs chia seeds

  • ½ cup rough chopped nuts of choice for topping (optional)

*I used approx 2 small/medium apples, 2 medium stalks or rhubarb and a large handful of raspberries (I didn't measure precisely but it equated to a good cup of fruit once cooked down)

Method:

Mix the oats, ground almond and tiger nut flour dried with the melted coconut oil and syrup. Set aside approx. 1/4 of this mixture for the topping (or more for a thicker topping).

To the remaining mix, add the chia ‘gel’ to help bind. Press the crumble mix firmly into an 8” square pan- it should be approx 1cm deep.  Bake for approx 15 minutes at 180C until just golden.

Meahwhile stew the fruit in a saucepan, adding a little syrup to taste as the rhubarb and raspberries are tart. No extra liquid is required as the fruit will release it's own. Add the chia seeds during the last few minutes to help thicken.

Remove the base crumble from the oven and spread the fruit layer evenly over the top. Add the reserved crumble mix, plus extra chunky nuts if desired.

Bake for another 5 minutes or so until the topping is golden and the fruit bubbling.

Serve hot or cool (note: the bars slice better when cool)


tiger nut crumble bars 1a.jpg
Read More

Bean & Beat Burger with Portabello Buns

I actually first made this recipe many months ago... 2nd November 2016 to be exact (I can tell by my camera data!) and it's been sitting in my recipe archive folder waiting to be released to the world- amongst countless other recipes. Crazy, really how they all pile up! 

One of my missions this year is to get back into a regular blog posting schedule. To think when I began this blog in 2011 I was posting around three times a week- sometimes more, and that was when I still had my full time career as an architect. So there is really no excuse! ;-) 

portabello burger bun.JPG

I was reminded of this recipe a recently, as I was coming down from a week-long juice fast and I wanted to make a meal, to celebrate with my boyfriend, the return to normal food. I wanted it to be reasonably light, made mostly with veggies and no wheat or refined ingredients (though there was a little oil on the mushrooms caps). The result was this epic burger platter! (ok it was a little larger than I'd anticipated) ;-)

Portabello mushroom caps make amazing burger buns if you want to avoid bread, and you can really use any veggie burger mix inside. In the iphone photo above is the recipe featured below, but in the other 'pro shots' taken in 2016 I used this vegan meatball mix formed into burger patties instead of balls (both would freeze well too so you can make extra).

Then simply layer the burger up with avocado, hummus, relish, chutney, salad leaves, sprouts as tall as you like!

portabello burger bun.jpg

Recipe: Bean & Beat Burger with Portabello Buns

Serves two (makes approx 4 medium burgers)

Ingredients:

  • 1 can black beans - drained and mashed with a fork

  • 1/2 small beetroot

  • 2 cloves garlic

  • 1 onion

  • 1 cup cooked quinoa or rice

  • 1 cup gram flour (other flours would probably work)

  • 1/2 cup ground walnut (or other ground nuts)

  • 1 tbs soy sauce

  • 2 heaped tbs chopped herbs (I used parsley and rosemary as I had them to hand)

  • 4 large portabello mushroom caps.

  • a little olive oil.

Method:

Finely chop the beetroot garlic and onion (I used a food processor for a quick blitz) and then saute for a few minutes in a medium sauce pan until softening. Meanwhile gather all remaining ingredients (other than mushrooms/oil) and then add to the pan. Turn off the heat and stir through in the pan until well mixed and the mix holds together.

Form burger patties with your hands and place on a lined baking sheet. I didn't oil them but you could if desired. Bake at 180 for approx 30 mins ensuring they don't burn.

Meanwhile, wash and pat dry the mushroom caps. Chop the stalk out (you could do this in advance and add to the burger mix to void waste). Lightly brush will oil on both sides then sprinkle with salt and paper.

Once the burgers have been baking for 15-20 mins. Place the mushrooms under a hot grill for approx 5 mins on each side until quite 'sweaty' looking.

Prepare any other toppings and a side salad. (For the 'coleslaw' style salad in the top photo I just used slightly water down hummus to coat)

Assemble the burgers in any way you wish! Enjoy immediately.

portabello burger bun.jpg


Read More
main meals, gluten free, Recipes jo hodson main meals, gluten free, Recipes jo hodson

Baked Falafel Pie... an easy meal to feed a crowd!

Wow... you're getting two recipes within a week.... it's like the days when I first started my blog when I often used to get three recipes up here per week! That's when I had a full time job as an architect too.... crazy days, how did I find time to do it all!

Recipe: Baked Falafel Pie

These days I develop so many recipes for destinations beyond this blog itself... such as for Real Food Source, my own ebooks and other publications that sometimes this space loses the battle of priorities. I am looking to charge all that again- with one new recipe per week from the New Year onwards- an early resolution of sorts?

Anyway, back to this recipe!

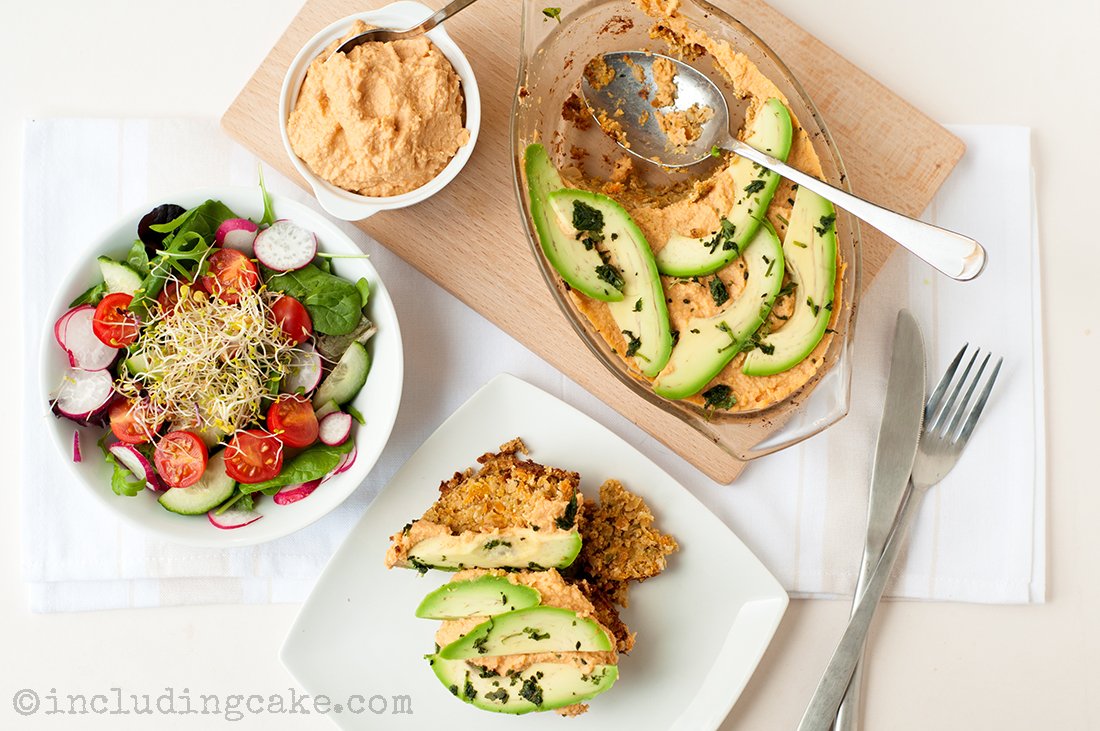
This came about a couple of week ago as I was developing new recipes for my Lanzarote retreat.... I wanted something that was delicious, filling and easy to cook for 8-10 people (though the recipe below is halved to feed about four). This is a total winner and a lovely spin on the more traditional falafel balls.

It's not my brainchild- there are loads of similar creations across blog land- I got the idea from a general Pinterest search looking for meal image ideas rather than any one recipe in particular. I imagine you could tweak this to add in other herbs or spices to suit. You could also add a chunky salsa, guacamole or other topping instead of hummus if you preferred.

I realised this recipe would be also very similar to my classic nut roast (still a go-to favourite and great to have on standby in the freezer) and so I used that as the base and made a few ingredient tweaks.

Let me know what you think.... I'll let you know how it goes down with the guests on my retreat ;-)

Recipe: Baked Falafel Pie

Recipe: Baked Falafel Pie

Serves 3 portions with salad or 4-5 if serving as part of a larger dinner

Ingredients 

  • 1 cup chopped nuts of choice

  • 2 tbs olive oil

  • One onion diced

  • One large garlic clove minced

  • 2 sun-dried tomatoes (optional for extra depth of flavour)

  • 1 large carrot grated

  • 1 medium courgette grated

  • 1 cup chickpeas

  • 1 cup oats (or cooked rice or quinoa or dry wholemeal breadcrumbs- GF if needed)

  • 2 heaped tbs flax (or tapioca or potato flour)

  • ¼ cup fresh coriander

  • 1 tbs ground cumin

  • 2 tbs soy sauce (GF if needed)

  • Salt and pepper to taste

Topping:

  • 1 tub hummus (or homemade if possible)

  • 2 sliced avocados

  • a sprinkle of salt and pepper

Method:

Pre-heat oven to 180C. coarsely grind the nuts and set aside. Finely chop and sauté vegetables in olive oil for 5 mins until soft. Mix all remaining ingredients in large bowl and add vegetables and nuts to it.

Mix and mash together well. Add more oats (or another dry ingredient) if mixture is too wet or a little water or stick if too dry.

Press mixture firmly into a greased and lined medium baking dish (it should be around a generous inch thick). Bake for approx. 45 mins until golden on top, the inside will still be moist. Add hummus and avocado slices to serve with salad or cooked greens.

Recipe: Baked Falafel Pie
Read More
jo hodson jo hodson

Juice Pulp 'Coleslaw'

Remember this post for my 'apple pie' juice?  Well, now I have a second recipe for you... this one is a little bit different.

This is NOT a juice!

One of the things that has always frustrating me about the idea of juicing is what to do with the pulp…. I almost feel like shouting ’Nooooooo’ as I tip it into the compost. 

When I was presented with the opportunity to trial the Juico Uno, my first inclination was to research recipes to use the pulp. If you are anything like me, that has probably played on your mind too. Organic veggies are not cheap and so I want to salvage an much as I possible can of them.  I know there are recipes out their for juice pulp burgers and such which I am yet to try but today I have something much, much easier. Plus it requires no cooking which also means no loss of nutritional value. Win win!!

Play around with various different pulp combinations. You may find some veggies are more fibrous than others, and some pulp remains wetter than others. I think the fact that this particulate batch had some tomato pulp gave it a great texture. 

Get creative with herbs and spices too. This recipe is simply a guide to get started.

I kept this batch in a sealed container in the fridge and used it as a side or topping for various meals and snacks over the following couple of days…. try in salads, mixed with hummus, over avocado toast, in sandwiches. Or even sprinkle over hot meals one such as pastas dishes once served, to give a boost of colour and fibre!

Checkout my little videos demonstrating the veggie juice (salad in a glass!) and also the pulp coleslaw in action!

You’ll see my Juico photos popping up over social media… plus a few videos clips I recorded. (you would have laughed at my ridiculous video set-up balancing my camera on a box stacked on a step ladder in the kitchen to get the angle)  I’m no video pro but i’m having fun trying!

P.s like I mentioned join my first post. I was gifted the Juico Uno Juicer in return for trialling it and producing content to show how it can be used… but as ever all the thoughts here are all my own!

If you have a juicer… you must give this a go next time you have some veggie based pulp! (then let me know what you think!)

Recipe: ‘salad’ coleslaw

Serves approx. 4

Ingredients- The pulp leftover from juicing:

  • 1 red pepper
  • 2 large carrots
  • 6 romaine lettuce leaves (or equivalent)
  • 1 garlic clove
  • 3 tomatoes

Plus:

  • 1 tbs olive oil
  • 1 tbs balsamic vinegar
  • a little salt and pepper to taste
  • herbs or species to taste (I used a tablespoon chopped fresh mint or you could use a sprinkle of cayenne for a kick)

Method:

Make the juice using the vegetables and set aside to consume separately

The remaining pulp will be fairly wet due to the nature of vegetables used.  Toss with a fork to mix and then add the remaining ingredients. Toss again to mix and then serve as a side or anywhere you’d use ‘coleslaw’ such as a burger topping’. 

Why not sign up for my newsletter in my sidebar where I feature roundups and special offers plus my FREE ebook. If you are new round here you might like to check out my 'About' tab up top. To buy healthy nibbles you can also find me over at my sister site Wholeplus. 

Day to day you can always find me hanging out in these places:

Read More
round ups, Recipes jo hodson round ups, Recipes jo hodson

Picnics... the plant-based way!

Schools out...and so is the sunshine, er kinda...

The sun might have hidden the last few days where I am but excusing the little blip in the weather  (I hope) it has been HOT HOT HOT as of late... and that means one thing, dining al fresco!

Even though the sun isn't out much today, I still sat outside to eat my lunch and that's when it occurred to me to write a picnic post for the holidays, so here you go!

It's funny really as sometimes blog posts take a while to come to fruition... beginning as a thought that might sit in my 'drafts' or 'to try' folders on Evernote for months. Yet sometimes they literally spring forth in a matter of minutes. Being the messy creative type you could probably guess that I don't have a lot of structure going on behind the scenes when it comes to blogging, it;s kind of whatever my head throws up in any given moment... hmmm, yeah I should probably get onto that ;-/

I was also sitting and dreaming about my retreat and all the food i'd love cook up- simple yet tantalising dishes that everyone (including kids and picky eaters) would enjoy and most importantly be able to recreate back home! This seemed to lend itself nicely to the picnic philosophy, so here's a little round up of ideas to get you going... if you make any off them please take a pic and tag me on Facebook or Instagram as it always bring a super shiny smile to my face!

The lunch I happened to be sitting and eating earlier was this one... a spin on my classic 'chickpea cauli quiche' (featured in the round up) and because it was a little different (with broccoli subbing some of the cauli) I figured it was deserving of a full recipe post of it's own.

Recipe: Cauli-Brocolli Mini Quiche

Makes 4 mini quiches

Ingredients: 

  • ½ heaped cup finely processed broccoli (approx. 4 florets or stalk)

  • ½ heaped cup finely processed cauliflower (approx. 4 florests or stalk)

  • 1 cup chickpea flour

  • 1 tbs flax

  • ½ tsp salt

  • 3 cloves crushed garlic

  • 1 heaped tsp dried mixed herbs

  • 1 scant tsp baking powder

  • ½ cup water (plus 1-3 tbs extra if needed)

  • ½ a red onion- chopped

  • ½ a courgette sliced into thin half moons or quarters

Method:

Add all ingredients to a food processor other than the water, red onion and courgette. process until the cauliflower and broccoli are a rice-like consistency (it should be a bit pasty due to the chickpea flower. 

Tip the sticky mix into a medium mixing bowl and add the chopped onion (courgette can be added now or at the end end). Add the water and mix through well until the mixture is very thick but easily spoonable and the top can be smoothed, add a little extra water if needed but not so that the batter is runny.

Spoon the mix into large muffin cups (or an 8" tin) I use silicone muffin cups/tin, but you could also use a metal one with removable bottom or line the cups to ensure easy removal.

Press the mixture firmly into the cups and smooth the tops, press the courgette into the tops. Bake at 180C for approx. 20 mins for muffins (longer for a single large quiche) until the tops are nice and a skewer comes out almost clean.

Serve either hot or cold. Perfect cold for picnics and because it freezes well it can also be made in advance.


Plant based picnic round up...

All the recipes are perfect for portioning, for serving cold and making in advance. Perfect for picnics ...or just whilst sitting on a blanket in the garden!

They appear a little randomly below as they are listed in chronological order in the summary window. P.s the cauli-cheese sauce makes the perfect dip alternative to hummus which is why I included it!

I'd love to hear your own picnic ideas too... let me know in the comments!


Read More
beverages jo hodson beverages jo hodson

Healthy Pimms... with a quirky ingredient!

One of the ladies who joined my 30 Day Summer Drink Up Challenge (we're in the final week now!) suggested this idea to me last week. At the time it had me intrigued and I thought it sounded pretty genius but I wanted to test it out for myself to see what she was raving about!

Testing done and I concur it's pretty awesome for such a simple trick! 

It's the time of year when the weather is hotting up, so keeping hydrated becomes even more important. I's so easy to get sucked into drinking sugary sweet drinks so this is a beautiful twist on a classic and isn't really sweet at all except for a subtle aftertaste from the chopped fruits. Perfect if your taste buds prefer less sweet beverages or you are looking to make a shift. 

Open your mind and embrace its uniqueness. It's so simple, it's worth giving it a go to find out one way or the other... I loved it, but my mum wasn't such a fan.

I can't wait to hear what you think!

What's your favourite classic summer time beverage?

Recipe: Heathy 'Pimms'

Serves 3-4

Ingredients:

  • 1 litre good quality sparkling water 
  • 1-2 tsp good quality balsamic vinegar
  • 1 tbs apple, grape or cranberry juice (if desired)
  • large mixed handful of chopped strawberry, cucumber and fresh mint

Method:

Mix the lowed together and add the chopped fruit. Allow to sit for at least minutes for the flavours to infuse before adding ice to serve. Alternatively, prepare a few hours in advance and let sit in the fridge to chill and flavours to muddle a little more.


Why not sign up for my newsletter in my sidebar where I feature roundups and special offers plus my FREE ebook. If you are new round here check out my 'About' and 'Getting Started' tabs up top. To buy nibbles you can also find me over at Wholeplus. 

Day to day you can always find me hanging out in these places:

Read More